Updated 3/16/2025
| Model | Memory | Volts | Off Current | Idle Current | Watts |
|---|---|---|---|---|---|
| RPi-5B | NVMe 256G | 5.04 | 0.3 | 0.54 | 2.7 |
| RPi-5B | NVMe 512G | 5.1 | 0.3 | 0.8 | 4.1 |
According to the Offical Raspbeery Pi documentation - Getting Started , you can run the Raspberry 5B from a 5-volt, 3-amp, power supplly, but it limits the peripherals curent to 600 ma.
Add the following to /boot/firmware/cmdline.txt:
nvme_core.default_ps_max_latency_us=2500
If you power up the Pi with the monitor not on, you may get a back screen with a cursor that moves. The fix without rebooting is to get to the terminal login by hitting CTRL+ALT+(fn)F1 [1]. After logging in, you can restart lightdm:
sudo service lightdm restart
A more permanent fix is to add the following to the end of /boot/firmware/cmdline.txt [2]:
vc4.force_hotplug=1
The Raspberry Pi-5B, Real Time Clock (RTC) is in the Power Management Integrated Circuit (PMIC).
The Official Raspberry Pi Battery is a Pasasonic ML-2020, Rechargable Magansese-Lithum batter.
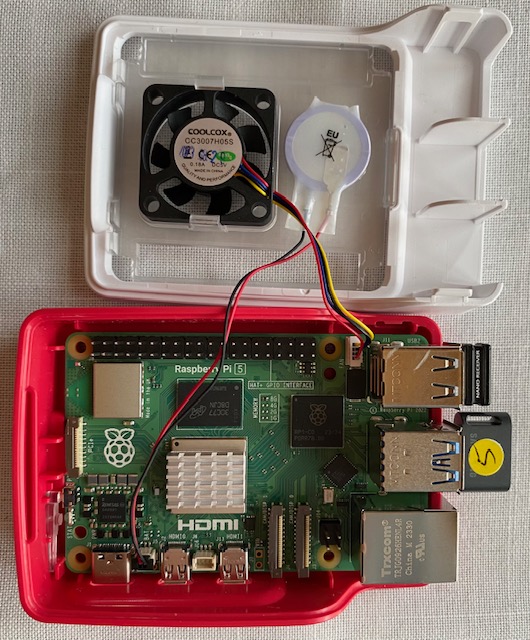
Added Photos: battery, battery connector, and PMIC.
To check the RTC battery charging voltage and limits:
cat /sys/devices/platform/soc/soc:rpi_rtc/rtc/rtc0/charging_voltage
cat /sys/devices/platform/soc/soc:rpi_rtc/rtc/rtc0/charging_voltage_max
cat /sys/devices/platform/soc/soc:rpi_rtc/rtc/rtc0/charging_voltage_min
By default, charging is disabled. That is charging voltage = 000000
To enable RTC battery charging, add the following line to /boot/firmware/config.txt:
dtparam=rtc_bbat_vchg=3000000
Recheck the charging voltage:
cat /sys/devices/platform/soc/soc:rpi_rtc/rtc/rtc0/charging_voltage
You can read the RTC battery voltage with the following command [2]:
vcgencmd pmic_read_adc BATT_V
Video Core General Command (vcgencmd)
Power Management Integrated Circuit (pmic)
Analog-to-Digital Converter (adc)
Since, you should avoid hot locations, there is no good place to put the RTC battery. I found the following in the Official Raspberry Pi Forum for Industry [2]:

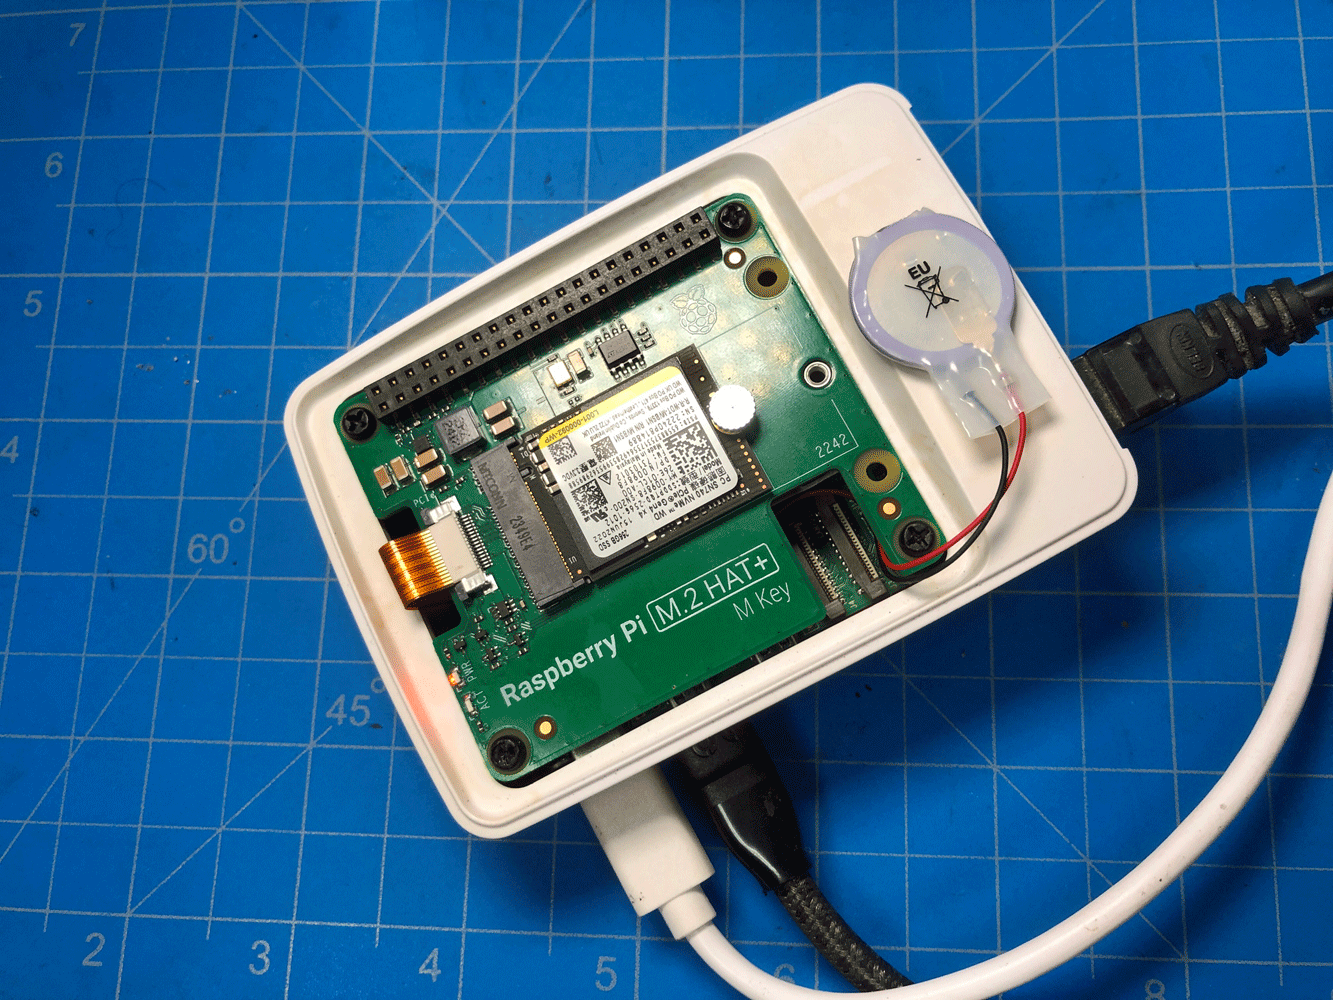
If you install the Offical M.2 HAT+ in the Offical RPi-5 case, the top lid will not fit. So I placed my RTC battery on the outside of the case.

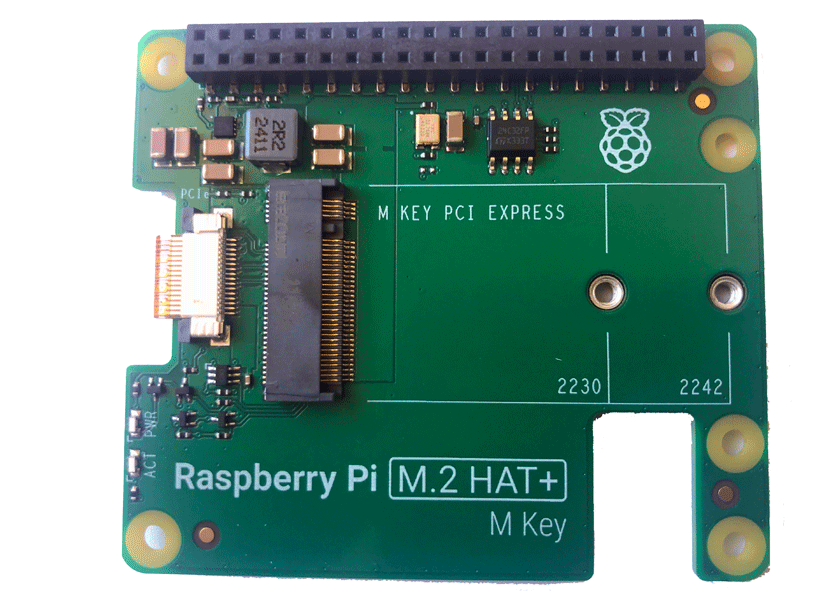
The Official Raspberry Pi M.2 HAT+ will only accept M.2 NVMe sizes 2230 and 2242 cards. It will NOT accept the more popular size 2280 card.
The M is the specification is card edge connect slot or key.
The Raspberry Pi-5B PCIe interface to the HAT+ is a single lane (x 1). Whereas the PCIe interface on my HP mini's are all 4 lanes (x 4).
By default, the PCIe connected to the NVMe SSD uses Generation 2 speeds. Gen 3 is double the speed of Gen 2. The Raspberry Pi-5B does not officially support Gen 3, but you can enable it.
To enable PCIe Gen 3.0, add the following line to /boot/firmware/config.txt:
dtparam=pciex1_gen=3
I have yet to hear of anyone have stability problems with Official Raspberry M.2 HAT+ when enabling PCIe 3.0. It works even with my inexpensive Western Digital PC SN740 256GB ($24 Jun 2024). However, some third-party HAT boards have had problems with some NVMe SSD's [4]
Acronym: dtparam - device tree parameter
Although I did not see anything about this in the Official Documentation of the HAT, you can use the Menu -> Accessories -> SD Card Copier, to copy the OS and other data to the HAT's NVMe SSD [3].
I have not been able to find where the new bootloader was anounced, but according to Cris Barnatts at YouTube ExplainingComputers, the new bootloader arrived on Oct 10, 2024. The new bootloader allows you to hold down the space bar while booting, and a boot menu will appear on the screen. To use it, you need a wired keyboard (or an Apple's magic keyboard with a cable). The new bootloader is also not the default bootloader. You have to use rasp-config to select it. There are some other things you need to do. See references below:
References:
The only NVMe SSD I have used so far is the WD SN740 256GB, Gen 4x4 2230. According to Tom Hardware, is that the SSD draws more power, and runs hot. I have not had any problems with it. This may be because, I am using to 256GB version. It is also available with 500GB, 1TB and 2TB capacities.
The short answer is sort of. It will fit in the case, but you can not put the top on. Furthermore after you have everything in place, to keep it in place, you will need to secure the RPi-5 with screws (size M2.5 x 8) that go under the case into the standoffs.
The 1st Offical Raspberry Pi M.2 HAT+, order from PiStore.us, had plastic screws that were too short to go under the case and reach the standoffs. Mine also came with some brass standoffs and screws taped to the outside of the box. At the present, I do not know what the brass standoffs are for.
My 2nd and 3rd Official M.2 HAT+, ordered from Sprkfun, onl had plastic screws and standoffs.
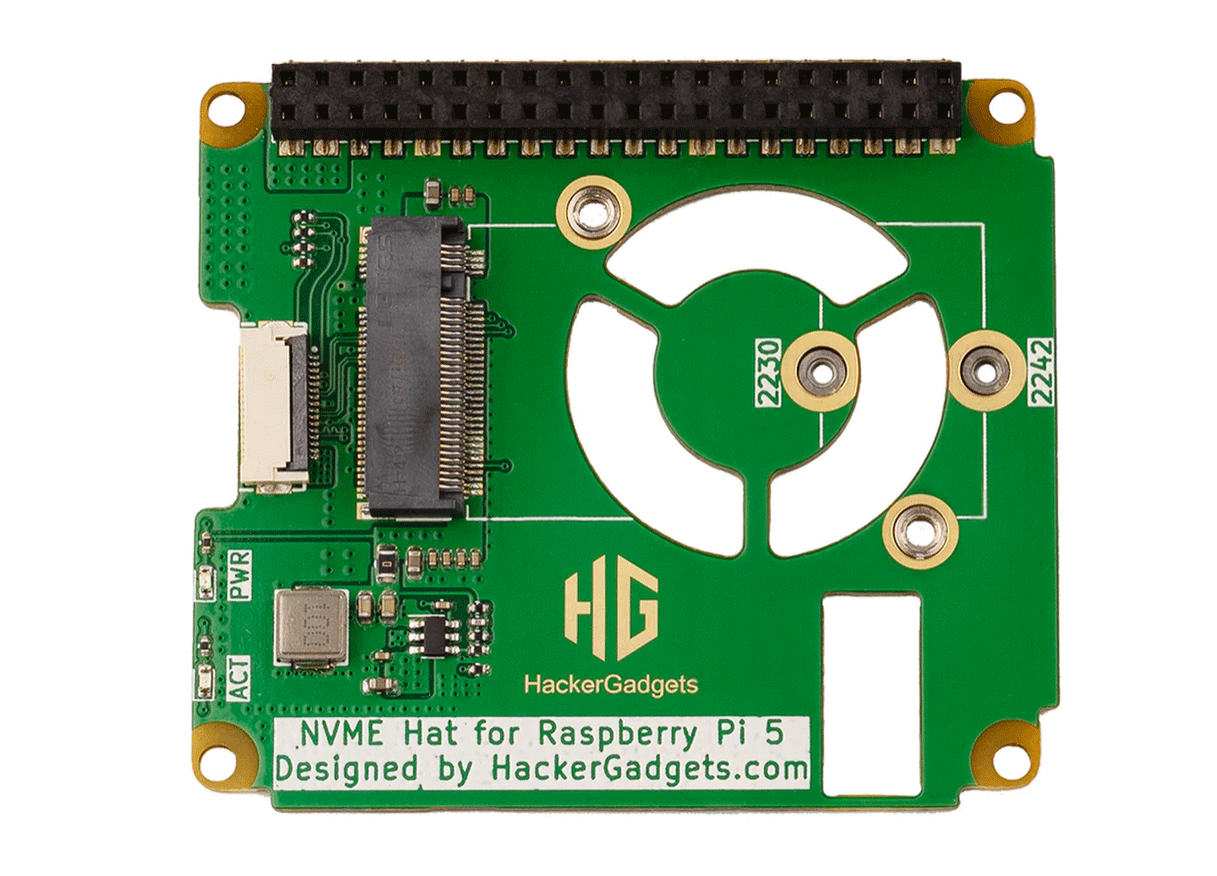
The only reason that the top lid will not fit on the case is that the Raspberry Pi organization did not chose to notch the pc board at the corners were the screw holes are. Another manufacturer, HackerGadgets, did notch the pc board so the top lid will fit.


The Raspberry Pi Documentation said to use: sudo raspi-config -> 6 Advanced Options -&ft; A4 Boot Order -> B2 NNMe/USB then SD Card.
However, Cris Barnett in Reference 3, accomplished this by modifies the eeprom:
sudo rpi-eeprom-config --edit
Add the number 6 to the end of line that starts with BOOT_ORDER. For example, change BOOT_ORDER=0xf41 to BOOT_ORDER=0xf416.
Part of the HAT+ standard, specifies that the fingers on the flat flexible cable are on opposite sides of the cable. This prevents plugging the cable in backwards and shorting something out.
The M.2 HAT was anounced with the Raspberry Pi-5B in October 2023. However, the Offical Raspberry Pi M.2 HAT did not come available until 7 months later, May 2024. In December 2023, the HAT+ specification was announced. The original HAT specification was written back in 2014. The new HAT+ specification includes autodetection.
Between the amouncement of the M.2 HAT and its availabiity, third-party companies started manufacturing and selling M.2 HATs. One of these was Pineberry Pi. The Pineberry Pi M.2 HAT does not implement the autodect feature in the HAT+ specification [5]. The Pineberry Pi M.2 HAT will work with the Raspberry Pi 5B, but the installation procedure is not the same. The Pineberry requires an extra line be added to /boot/firmware/config.txt [6]:
dtparam=nvme
In addition, if you want to boot to the NVMe, then the following line need to be added to the eeprom [5][6]:
PCEI_PROBE=1
Both Pineboards and Pimeroni offer HAT Boards with Dual NVMe SSD's. However, according to Jeff Geerling, all of the current multi-NVMe boards use the ASMedia, ASM1182e chip set, which is a PCIe Gen 2.0 that maxes out at 400MB/sec. use a Gen 2 chip set, ASM1182e, which maxes out at 450 MB/sec. According to Jeff some vendors are working on Gen 3.0 boards. Finally , booting off of the Multi-NVMe boards is also a little flacky although Raspbery Pi is working on the problem.
Pineboard also makes a NVMe HAT with an extra Ethernet port (travel router) [2].
Pineboards also has a compatibility/non-compatibilit NVMe SSD list [3]. Pineboards recommends staying away from Western Digital Boards completely. However, they have modified their boards to now work with some WD NVMe [3].
To run drive benchmarks, install Hard Drive Parameters:
sudo apt install hdparm
and run the following:
sudo hdparm -t --direct /dev/nvme0n1
My results, with the Official Raspberry Pi M.2 HAT+ and a model Western Digital PC SN740 (256KB) NVMe were:
| Computer | Interface | MB/sec |
|---|---|---|
| Pi 4 | SD Card | 49 |
| Pi 5 | SD Card | 81 |
| Pi 5 | USB NVMe 3.0 | 360 |
| Pi 5 | HAT PCIe 2.0 x1 | 390 |
| Pi 5 | HAT PCIe 3.0 x 1 | 745 |
| HP G4 | PCIe 3.0 x 4 | 1175 |
| HP G6 | PCIe 3.0 x 4 | 2681 |
| HP G9 | PCIe 4.0 x 4 | 1700 |
There is a website that is devoted to benchmarking RPi-5B, M.2 HAT+ with NVMe SSD:
https://pibenchmarks.com
There you will find benchmarks for most NVMe's, and at the top of the page, is a curl statement to run your own benchmark.
Warning running pibenchmark.com's curl script may install unnessary software on your system.
The score on my system was a respectful 53,712, which is about the same as the Samsung 980 Pro.
The locals and keyboard were set up correctly for my administrator user with sudo privileges. However, for my user without sudo privileges, the locals were correct but the keyboard was set the English (UK) instead of English (US). I had to temporally give this user sudo privileges to change to the English (US) keyboard layout.
This is definitely a bug. It has happened to me more than once. The last time, it said the keyboard was US, but the special keys were UK. See photographs below.


This time, I had to do more than just add my second_user to the sudo group:
sudo gpasswd -a second_user sudo
I had to add a line to the /etc/sudoers file with the command:
sudo visudo
The added line is:
second_user ALL=(ALL) NOPASSWD:ALL
Then with the GUI : Menu -> Preferences -> Keyboard and Mouse, I set the keyboard to UK and then back to US.
Warning, if you have any of the special characters that are different and you reboot, you might not be able to log in on either user. I found this out the hard way.
Afterwards, remove the second_user from the sudo group:
sudo gpasswd --delete second_user sudo
The big question is could have done the same thing with the super user that already had sudo privileges.
On Oct 28-29, 2024, the Rapsberry Pi OS switched their Wayland compositor from Wayfire to Labwc. After this update, the British keyboard problem came back. I was not able to login on either my sudo or non-sudo account because I used special characters in both passwords.
The solution was simple. Use the location of the British special characters to log in. Then with the GUI : Menu -> Preferences -> Keyboard and Mouse, set the keyboard to UK and then back to US.
The Raspberry Pi OS want to do more with less. To improve the display performance, the Raspberry Pi software team decided to swicth from X11-Windows to Wayland. In preparation for this, in November 2021 with the upgrade to Bullseye, the windows manager was changed from OpenBox to Mutter []. Wayland requires a compositor, and Mutter is a compositor. In April 2022, the Rapsberry Pi OS, gave user the option to use Wayland and Mutter []. In Oct 2023, with the Bookworm upgrade, Wayland became the default display system; however, the compositor was changed from Mutter to Wayfire. In Oct 2024, the compositor was changed again []. This time from Wayfire to Labwc (Lab Wayland Compositor).
Thankfully, most of these changes have required the user to do nothing. The exeception is the British keyboard problem that came back with the switch to Labwc. For details see the British keyboard section below.
The change to wayland is not compatible with the built-in screen capture app scrot or the very popular gui app gnome screenshot.
Wayland has been the default for 1.5 years and still not fix. The work around is to use the apps slurp and grim [2].
References:
As of Oct 2024, the RealVNC Viewer is working the the built-in WaylandVNC Server. However, I currently having scaling and performance issure. The cursor lag is so bad that it is almost unuseable.
As of Bookworm (Oct 23), the default windows systems was changed from X11 to Wayland. This resulted in a significate performance boost. However, initially, the VNC clients were not ready for this change.
On the server side, the Raspberry Pi OS used "WayVnc" server. This is from the Raspberry Forums: "WayVNC does not support taskbar icon, file transfer etc."
The RealVNC and other vncviewer were not ready for these changes. For viewer, Raspberry Pi Ltd, said that they had good results with TigerVNC, which ran in a Java virtual machine.
According the official Raspberry Pi documentation here , you should download the jar file, which is a java file. Hence, this is running in a java virtual machine. This will work, but the button are not correctly shown on the screen, and besides the viewer screen there is a open console screen. The only way to show multiple VNC screens is the run the java machine again. Now you have 4 screens open two views and two consoles, and the tittle bar does not indicate which viewer is which. This is pretty much non-usable for multiple VNC screens.
Download the latest "jar" version of TigerVNC:
Release Page if TigerVNC GitHub RepositoryInstall the Java Runtime Engine:
sudo apt install default-jre
To run the viewer:
java -jar VncViewer-
You might want to put the last command in a scrip file.
Thorough ouf the years, the Raspberry Pi OS has used several Dynamic Host Confirguration Protocols. Unfortunately, these have effected users, and required users to make changes to their configuration files.
I am disappointed that the Raspberry Pi 5B isn't usable at playing back 4k video. Over time, this has improved, but it is still not good enough.
All it takes is a small video playing in an ad on a web page, and after a while the fan will speed up causing a noticeable and irritating noise.
I might be able to stop this with a FLIRC case. However, will it be compatible with the m.2 hat, and will it be able to dissipate the extra heat from an SSD.
I too have experienced the same problems as others when attempting to boot from an external USB-NVMe SSD enclosure with a Pi 5 connected to a USB 3.0 port [1].
The same hardware works flawlessly when connected to a Pi 4, USB 3.0 port or a Pi 5, USB 2.0 port.
At the present, I believe this only occurs when using the external enclosure as the boot drive.
You can recreate the problem by using a USB 2.0 port to install the Raspberry OS, and after setup, switching to a USB 3.0 port. This results in a 37 second delay when you shut-down or reboot the Pi 5.
My external enclosure is a Orico PWM2-G2 with a Realtek RTL 9120 bridge chip. My SSD is a WD SN740 NVMe 256GB SSD.
The same SSD, in another enclosure that uses a JMicron 583 bridge chip, works flawlessly with the Pi 5, USB 3.0 port. It has a slightly slower read speed - 325 MB/sec vs 360 MB/sec.
With the Orico enclosure and a Samsung PN MZVLB256HBHQ-000H1 SSD, the 37 second delay when you shut-down or reboot occurs about one-half of the time. My mouse pointer also froze once.
I tried my older JMicron 583 USB-NMVe stick with a Samsung SDD and everyting worked as it should. No delay shutdown or rebooting. My read speed was 360MB/sec. The stick did not original work with a WD SN740. I upgrade the JMicron firmware from version 2.02 to version 2.24, and it worked correctly with a read speed of approximatley 325MB/sec.
This problem is with the Pi 5B, its USB 3.0 Ports, and the Orico GMW-G2 with a Realtek RTL 9120 USB-NVMe Bridge.
References:
I purchased the same USB enclosure for a M.2 MVMe drive as Chris Barnett (YouTube - ExplainingComputer):
Except, I mistakenly ordered the one with the USB-C to USB-C cable.
Specifications:
Setup:
The command:
lsusb -t
showed that with the Amazon certified cable only the older and slower protocol "usb-storage" was used and not the newer higher speed "usap" protocol.
| Cable | Length | Speed MB/sec |
|---|---|---|
| Amazon Basic Certified 10Gbps | 36 | 37 |
| Orico USB-C with 10 Gps Adapter | 9 | 358 |
Circo GMW2-G2 Encloser (PCIe Gen 2):
| Model | Size | Gen. | Lanes | Speed MB/sec |
|---|---|---|---|---|
| WD 740 | 2230 | 4 | 4 | 358 |
| WD 570 | 2280 | 3 | 4 | 358 |
| WD 520 | 2280 | 3 | 2 | 358 |
| Micro Center | USB 3.0 | USB 3.0 | 32 | 96.5 |
| SanDisk Ultra | USB 3.0 | USB 3.2 Gen 1 | 32 | 26.62 |
| SanDisk Ultra | USB 3.0 | USB 3.2 Gen 1 | 32 | 36.01 |
| SanDisk Ultra | USB 3.0 | USB 3.2 Gen 1 | 128 | 151.6 |
| SanDisk Ultra Fit | USB 3.0 | blank | 32 | 140.4 |
| SanDisk Ultra Fit | USB 3.0 | blank | 32 | 89.2 |
Reference:
TRIM
TRIM (trimming) minimizes the wear and tear of flash drives and improves its performance.
To obtain the read speed:
sudo hdparm -t --direct /dev/sdaTo determine if it is using the fallback usb-storage protocol or the higher speed usap protocol, run the following command:
lsusb -t
After spending about 10 hours on this problem, I finaly stumbled upon a work around [1]. In the /etc/usb_modeswitch.conf file, change DisableSwitching=0 to DisableSwitching=1. I have no idea what this change does and neither does the author that suggested it.
After changing this line, my read speed changed from 37.2 MB/sec to 360 MB/sec.
I do not know if this is an Orico problem or a problem with Samsung's Model 980 NVMe M.2 500 GB. At least one person in reference [1] was using the same Samsung Model 980 NVMe drive. I
I am still not sure this is working correctly. It now takes almost 40 seconds to shutdown or reboot the system.
I also have the 40 second shutdown problem with the Western Digital SN740 2230 Gen 4 x 4.
| lsusb [options] | |
|---|---|
| -t | tree view |
| -d | by device ID |
| -s | specific device by bus |
| -v | verbose output |